Here you will find free plans for building your own spudgun. These potato guns are from some of my very early designs and can be improved upon. They are a good starting point into the potato gun hobby. They are fairly powerful, and easy to build. Also these designs can be modified and tweaked for better performance. If you are looking for a spudgun with a little more advanced features, check out the BL Series launchers. Be sure to read the solvent welding section of the site for proper PVC gluing techniques.
![]()
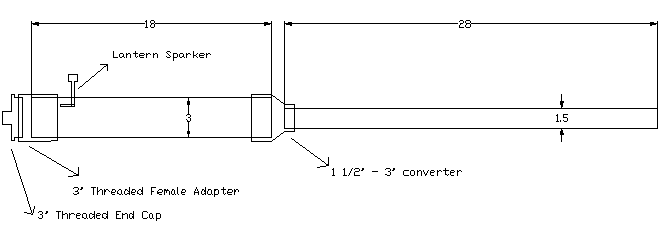
Spud Buster
The Spud Buster is one a simple modification of my first potato gun. I made the barrel slightly shorter and the expansion chamber bigger. There is not too much going on with this gun other than the basics. This is a no-fail gun. I made one like this that lasted for 2 or 3 years until I "dropped it." This is definitely an old school gun, designs like this have been floating around the net for at least a decade!
|
Item |
Length |
Where to buy |
|---|---|---|
|
N/A |
Camping Section of Store |
|
|
3" Schedule 40 PVC ** |
18" |
Hardware Store |
|
1 1/2" Schedule 40 PVC |
28" |
Hardware Store |
|
1 1/2" to 3" Converter |
N/A |
Hardware Store |
|
3" Threaded Female Adapter |
N/A |
Hardware Store |
|
3" Threaded Male End Cap |
N/A |
Hardware Store |
|
PVC Primer |
N/A |
Hardware Store |
|
PVC Glue |
N/A |
Hardware Store |
** All PVC, including fittings, Must be pressure rated Schedule 40.
All measurements appear in inches
![]()
Mini T-Rex
The Mini T-Rex was my first potato gun that I designed totally by myself. It has a 3 inch expansion chamber with a 3/4 inch barrel. The best three things about the mini-rex are: it shoots almost as far as a big spud gun, you can get 6 shots per potato (vs. 1 or 2 for big ones), and it is quieter. Don't get me wrong, I like big BOOMS, but sometimes a smaller sound is less risky. This gun will not disappoint.
|
Item |
Length |
Where to buy |
|---|---|---|
|
N/A |
Camping Section of Store |
|
|
3" Schedule 40 PVC ** |
4" |
Hardware Store |
|
1 1/2" Schedule 40 PVC |
2" |
Hardware Store |
|
3/4" Schedule 40 PVC |
16" |
Hardware Store |
|
3" Schedule 40 PVC ** |
4" |
Hardware Store |
|
1 1/2" Schedule 40 PVC |
2" |
Hardware Store |
|
3/4" Schedule 40 PVC |
16" |
Hardware Store |
|
1 1/2" to 3" Converter |
N/A |
Hardware Store |
|
1 1/2" to 3/4" Converter |
N/A |
Hardware Store |
|
1 1/2" Coupler |
N/A |
Hardware Store |
|
3" Threaded Female Adapter |
N/A |
Hardware Store |
|
3" Threaded Male End Cap |
N/A |
Hardware Store |
|
PVC Primer |
N/A |
Hardware Store |
|
PVC Glue |
N/A |
Hardware Store |
** All PVC, including fittings, Must be pressure rated Schedule 40.
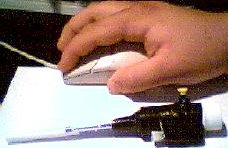
Original diagram lost....Here is a photo:
Notice the bad looking primer stains... This was before I knew what I was doing!
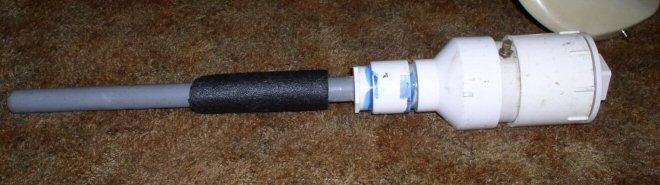
Pic of finished gun
![]()
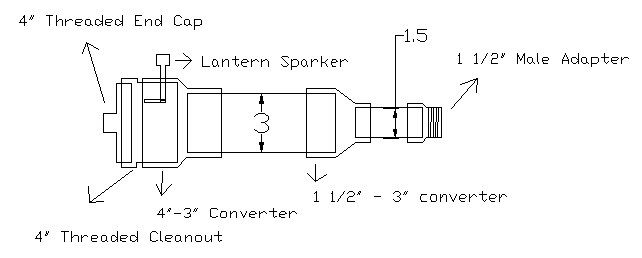
The Green Hornet
The Green Hornet is one of the best Potato Guns I had ever used up to the point when I made it. It shoots 75 yards farther than any Spud Gun I had used! One great feature is the interchangeable barrels. With the gun made this way, you can shoot any size barrel using the same body. This saves BIG $$$!
Remember to see my section on how to make the barrels.
|
Item |
Length |
Where to buy |
|---|---|---|
|
N/A |
Camping Section of Store |
|
|
3" Schedule 40 PVC ** |
7 1/2" |
Hardware Store |
|
1 1/2" Schedule 40 PVC |
3" |
Hardware Store |
|
1 1/2" Male Adapter |
N/A |
Hardware Store |
|
1 1/2" to 3" Converter |
N/A |
Hardware Store |
|
4" to 3" Converter |
N/A |
Hardware Store |
|
4" Threaded Cleanout |
N/A |
Hardware Store |
|
4" Threaded End Cap |
N/A |
Hardware Store |
|
PVC Primer |
N/A |
Hardware Store |
|
PVC Glue |
N/A |
Hardware Store |
** All PVC, including fittings, Must be pressure rated Schedule 40.
All measurements appear in inches
How to make Barrels for the Hornet
Important Information on putting in Sparker on this Gun :see tip #4
![]()
Micro Spudder
The Micro Spudder is a totally different potato gun. It is a mini potato gun, and so small it can fit into the palm of your hand. It isn't as powerful as bigger guns, but this gun is awesome, and can even be shot safely indoors, such as in a garage! A true mini spudgun.
|
Item |
Length |
Where to buy |
|---|---|---|
|
"Long Nosed" Lighter |
N/A |
Grill Section/Lighter Section of store |
|
Travel Size Tylenol |
N/A |
Gas Station/Pharmacy |
|
Electrical/Black Tape |
N/A |
Dept./Hardware Store |
|
Ink Pen |
N/A |
Almost Any Store |
|
2 Thumb Tacks |
N/A |
Almost Any Store |
Instructions
Preparing The Parts
These steps need to be done before the gun can be assembled:
Now that all that is done here's what to do:
1. Take the Electrical Tape and wrap it around the pen until it makes a snug fit into the cut off end of the Tylenol bottle.
2. Stick the pen into the Tylenol bottle and tape around it really good, so it is a strong, air tight seal.
3. Push the Thumb Tacks through the Tylenol bottle, like in the diagram below. Be careful, this is relatively hard to do. If you have a small drill bit it would be much easier to pre-drill the hole a bit smaller than the thumb tacks.
4. Grab the two wires that are attached to the Piezo Igniter (white thing from the "Long Nosed" lighter), and attach one wire to each Thumb Tack. It is not important which wire goes where.
5. You are almost done. Now tape the igniter onto the side of the Tylenol bottle.
Push the button on the igniter and you should see a spark inside the gun. To use it simply stab it in a potato, to make a potato slug, then spray in a super tiny amount of propellant, put the lid on and click the piezo igniter.
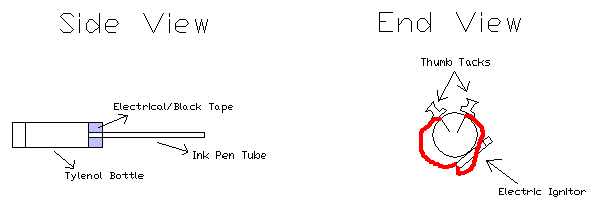
Pic of finished gun
A little fuel advice for miniature potato guns: Good fuels are Binnaca breath spray, Right Guard, or any other spudgun fuel. Mini spudguns are rather picky on fueling. The chamber is so small that you almost always get too much fuel. I have came up with a process to remedy this. Squirt a very small amount of your fuel in. Now slowly wave the spudgun back and forth about 2-3 times. Now cap the gun and it should fire. If not, either try less fuel, maybe more fuel (unlikely), or varying the times you "wave" the gun. It will work, I promise! A side note: Make sure nothing is in your line of fire while waving the mini spudgun.