Stun Gun Ignition :
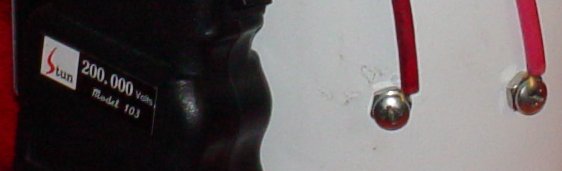
The much imposing 200,000V beast!
Stun guns: Truly a marvel to behold. Stun gun ignition is a spud gunners best friend. Stun guns produce a very powerful spark and make it very easy to wire multiple sparks into your chamber. There are several reasons why I feel this way about stun guns. The following list contains pros and cons of stun gun usage, as well as a few tips on using one.
Pros:
1. Stun guns are cool. I love the look on friend’s faces when I tell them I have a 200000V ignition source on my spud gun.
2. Stun guns are extremely durable. I have used one for at least 2000 rounds and it has never failed once. I have tried BBQ igniters before and they broke after 20 or so shots. This did not impress me at all.
3. Stun guns are cheap. Many people feel cost is a big issue on spud guns, and rightfully so. A common BBQ lighter cost about $12 to $15 in a store. I have bought a 100,000V stun gun on Ebay for about $18 after shipping. I bought my 200,000V one for about $25, and I recently purchased a 300,000V one for $32. If this seems like a large amount of money consider this: If you even had to replace your BBQ sparker once you would have at least $24 wrapped up in it. Now call me crazy, but I would rather put $3 with my $15 and buy a stun gun. Ebay is probably the best place to buy a stun gun.
4. Easy to wire. They are just as easy to wire as a BBQ igniter, but it is much easier to wire multiple sparks.
5. More design flexibility. If one knows about wiring and such it would be very easy to put different switches, remote controls, etc. to operate the stun gun.
6. Reusable. It is much easier to use a stun gun between multiple guns than any other ignition. I wouldn’t want to even attempt using the same BBQ igniter on other guns.
Cons:
1. Legality issues. Stun guns are legal in most places in the U.S., but not all. I know in Australia and some other foreign countries they are illegal.
2. Being shocked. This is probably the only fear most have about using a stun gun for ignition. I have been shocked, and while it wasn’t very fun, it was nowhere near as bad as I thought it would be. I wouldn’t let this be a deterrent in choosing a stun gun ignition, because it is easily remedied. The best way to fix it is by using good wires, like the ones found on television fly backs (the wires that look like they attach with a suction cup to the back of the screen assembly), and to cover your screws. I haven’t covered my screws, because I am careful when firing, and to tell you the truth being shocked doesn’t hurt bad enough to go to the trouble to cover them.
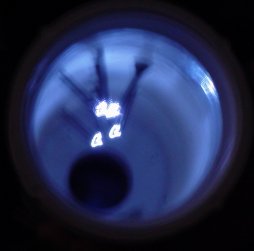
A pic in the dark, the sparks blurred the pic some but you can
still see the 4 sparks
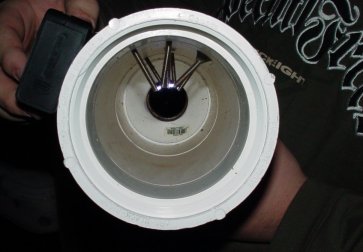
A pic in the light. Note to self: Do not stick hand
in chamber. :)
Instructions: Basically a picture is worth a thousand words, so to save myself 1000 words I have included pictures. J Here are a few general notes: The wires are attached to the outside post of the stun gun with crimp connectors. The wires must be attached to the outside so as not to interfere with the inside electrodes. The inside electrodes are the stun gun’s default path, and if it is interfered with, will ruin the stun gun. As a result when making multiple sparks the total gap between all the bolt sets must be slightly less than the gap between the default electrodes. This is a fairly easy step. The other part is attachment to the chamber. I use a hose clamp for this. There are several better ways to mount a stungun. One way is to use a project box (found at Radio Shack) and put the guts from the stun gun into it. These pics were a very early mounting style which can be much improved on.
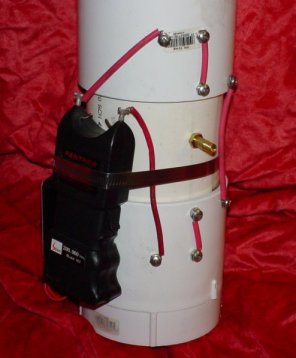
Wiring and attachment detail.